Compose choices
It’s time to put everything you’ve learned so far together into a complete and secure Daml model for asset issuance, management, transfer, and trading. This application will have capabilities similar to the one in the CN Quickstart. In the process you will learn about a few more concepts:- Daml projects, packages, and modules
- Composition of transactions
- Observers and stakeholders
- Daml’s execution model
- Privacy
Daml projects
Daml is organized in projects, packages, and modules. A Daml project is specified using a singledaml.yaml file, and compiles into a package in Daml’s intermediate language, or bytecode equivalent, Daml-LF. Each Daml file within a project becomes a Daml module, which is a bit like a namespace. Each Daml project has a source root specified in the source parameter in the project’s daml.yaml file. The package will include all modules specified in *.daml files beneath that source directory.
You can start a new project with a skeleton structure using dpm new project-name in the terminal. A minimal project would contain just a daml.yaml file and an empty directory of source files.
Take a look at the daml.yaml for the this chapter’s project:
name and version freely to describe your project. dependencies does what the name suggests: it includes dependencies. You should always include daml-prim and daml-stdlib. The former contains internals of the compiler and the Daml Runtime, the latter gives access to the Daml standard library. daml-script contains the types and functions for Daml Script.
You compile a Daml project by running dpm build from the project root directory. This creates a DAR file in .daml/dist/dist/${project_name}-${project_version}.dar. A DAR file is Daml’s equivalent of a JAR file in Java: it’s the artifact that gets deployed to a ledger to load the package and its dependencies. dar files are fully self-contained in that they contain all dependencies of the main package. More on all of this in Building and Packaging.
Project structure
This project contains an asset holding model for transferable, fungible assets and a separate trade workflow. The templates are structured in three modules:Intro.Asset, Intro.Asset.Role, and Intro.Asset.Trade.
In addition, there are tests in modules Test.Intro.Asset, Test.Intro.Asset.Role, and Test.Intro.Asset.Trade.
All but the last .-separated segment in module names correspond to paths relative to the project source directory, and the last one to a file name. The folder structure therefore looks like this:
daml/Intro/Asset/Role.daml:
import keyword. The LibraryModules module imports all six modules:
Project overview
The project both changes and adds to theIou model presented in Authorization:
-
Assets are fungible in the sense that they have
MergeandSplitchoices that allow theownerto manage their holdings. -
Transfer proposals now need the authorities of both
issuerandnewOwnerto accept. This makesAssetsafer thanIoufrom the issuer’s point of view. With theIoumodel, anissuercould end up owing cash to anyone as transfers were authorized by justownerandnewOwner. In this project, only parties having anAssetHoldercontract can end up owning assets. This allows theissuerto determine which parties may own their assets. -
The
Tradetemplate adds a swap of two assets to the model.
Composed choices and scripts
This project showcases how you can put theUpdate and Script actions you learned about in Authorization to good use. For example, the Merge and Split choices each perform several actions in their consequences.
- Two create actions in case of
Split - One create and one archive action in case of
Merge
return function used in Split is available in any Action context. The result of return x is a no-op containing the value x. It has an alias pure, indicating that it’s a pure value, as opposed to a value with side-effects. The return name makes sense when it’s used as the last statement in a do block as its argument is indeed the “return”-value of the do block in that case.
Taking transaction composition a step further, the Trade_Settle choice on Trade composes two exercise actions:
test_trade script in Test.Intro.Asset.Trade:
test_issuance script in Test.Intro.Asset.Role uses the output of the setupRoles script in the same module.
The same line shows a new kind of pattern matching. Rather than writing setupResult <- setupRoles and then accessing the components of setupResult using _1, _2, etc., you can give them names. It’s equivalent to writing:
(alice, bob, bank, aha, ahb) <- setupRoles would also be legal, but setupResult is used in the return value of test_issuance so it makes sense to give it a name, too. The notation with @ allows you to give both the whole value as well as its constituents names in one go.
Daml’s execution model
Daml’s execution model is fairly easy to understand, but has some important consequences. You can imagine the life of a transaction as follows:-
Command submission: A user submits a list of commands via the Ledger API of a participant node, acting as a
Partyhosted on that node. That party is called the requester. -
Interpretation: Each command corresponds to one or more actions. During this step, the
Updatecorresponding to each action is evaluated in the context of the ledger to calculate all consequences, including transitive ones (consequences of consequences, etc.). The result of this is a complete transaction. Together with its requestor, this is also known as a commit. - Blinding: On ledgers with strong privacy, projections (see Privacy Model) for all involved parties are created. This is also called projecting.
- Transaction submission: The transaction/commit is submitted to the network.
- Validation: The transaction/commit is validated by the network. Who exactly validates can differ from implementation to implementation. Validation also involves scheduling and collision detection, ensuring that the transaction has a well-defined place in the (partial) ordering of commits, and no double spends occur.
- Commitment: The commit is actually committed according to the commit or consensus protocol of the ledger.
- Confirmation: The network sends confirmations of the commitment back to all involved participant nodes.
- Completion: The user gets back a confirmation through the Ledger API of the submitting participant node.
Trade_Settle choice shown above. The choice transfers a baseAsset one way and a quoteAsset the other way. Thanks to transaction atomicity, there is no chance that either party is left out of pocket.
The second consequence is that the requester of a transaction knows all consequences of their submitted transaction — there are no surprises in Daml. However, it also means that the requester must have all the information to interpret the transaction. We also refer to this as Principle 2 a bit later on this page.
That’s also important in the context of Trade. In order to allow Bob to interpret a transaction that transfers Alice’s cash to Bob, Bob needs to know both about Alice’s Asset contract, as well as about some way for Alice to accept a transfer — remember, accepting a transfer needs the authority of issuer in this example.
Observers
Observers are Daml’s mechanism to disclose contracts to other parties. They are declared just like signatories, but using theobserver keyword, as shown in the Asset template:
Asset template also gives the owner a choice to set the observers, and you can see how Alice uses it to show her Asset to Bob just before proposing the trade. You can try out what happens if she didn’t do that by removing that transaction:
AssetHolder contract, and using that to authorize the transfer in Trade_Settle, Alice creates a one-time authorization in the form of a TransferAuthorization. If Alice had lots of counterparties, she would otherwise end up leaking them to each other.
Choice controllers are not automatically made observers, as they can only be calculated at the point in time when the choice arguments are known.
Privacy
Daml’s privacy model is based on two principles: Principle 1. Parties see those actions that they have a stake in. Principle 2. Every party that sees an action sees its (transitive) consequences. Principle 2 is necessary to ensure that every party can independently verify the validity of every transaction they see. A party has a stake in an action if- they are a required authorizer of it
- they are a signatory of the contract on which the action is performed
- they are an observer on the contract, and the action creates or archives it
exercise tradeCid Trade_Settle action from test_trade?
Alice is the signatory of tradeCid and Bob a required authorizer of the Trade_Settled action, so both of them see it. According to principle 2 above, that means they get to see everything in the transaction.
The consequences contain, next to some fetch actions, two exercise actions of the choice TransferApproval_Transfer.
Each of the two involved TransferApproval contracts is signed by a different issuer, which see the action on “their” contract. So the EUR_Bank sees the TransferApproval_Transfer action for the EUR Asset and the USD_Bank sees the TransferApproval_Transfer action for the USD Asset.
Some Daml ledgers, like the script runner and the Sandbox, work on the principle of “data minimization”, meaning nothing more than the above information is distributed. That is, the “projection” of the overall transaction that gets distributed to EUR_Bank in step 4 (transaction submission) of Daml’s execution model would consist only of the TransferApproval_Transfer and its consequences.
Other implementations, in particular those on public blockchains, may have weaker privacy constraints.
Divulgence
Note that principle 2 of the privacy model means that sometimes parties see contracts that they are not signatories or observers on. If you look at the final ledger state of thetest_trade script, for example, you may notice that both Alice and Bob now see both assets, as indicated by the Xs in their respective columns:
This is because the
create action of these contracts are in the transitive consequences of the Trade_Settle action both of them have a stake in. This kind of disclosure is often called “divulgence” and needs to be considered when designing Daml models for privacy sensitive applications.
Common Daml design patterns
Beyond the composition patterns above, this section covers common multi-party workflow patterns used in Daml. All examples below use aCoin asset model to illustrate each pattern.
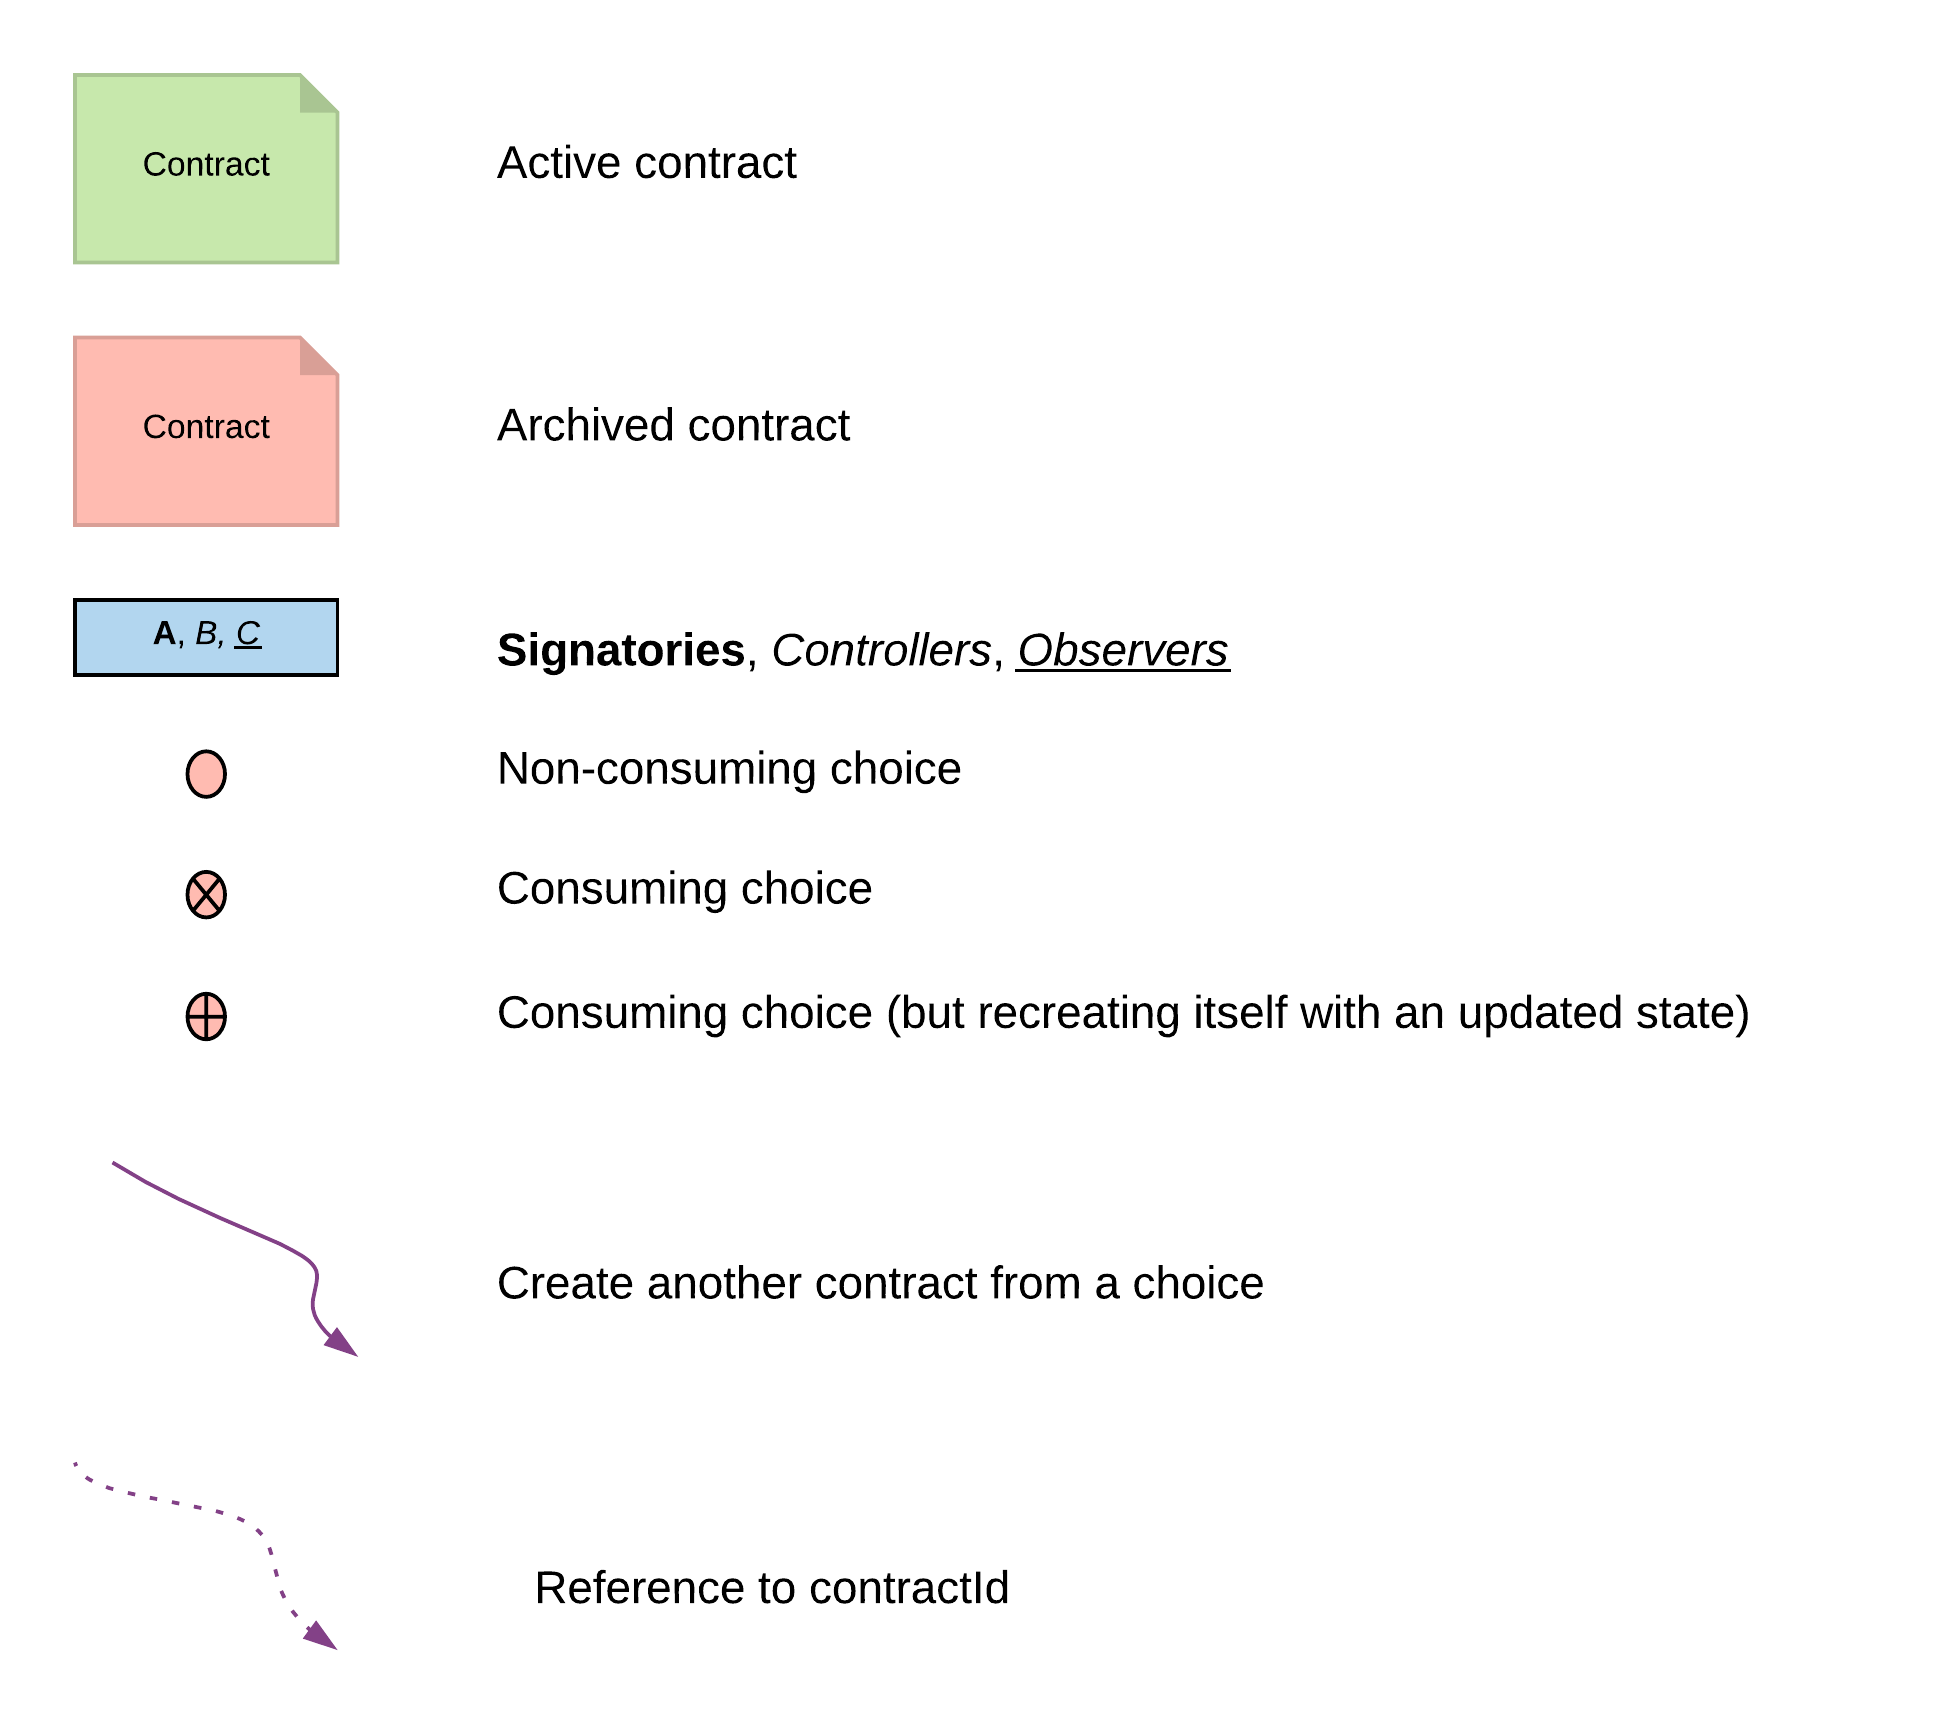
The diagrams below use a shared visual key for contracts, signatories, and choices:
Propose-Accept
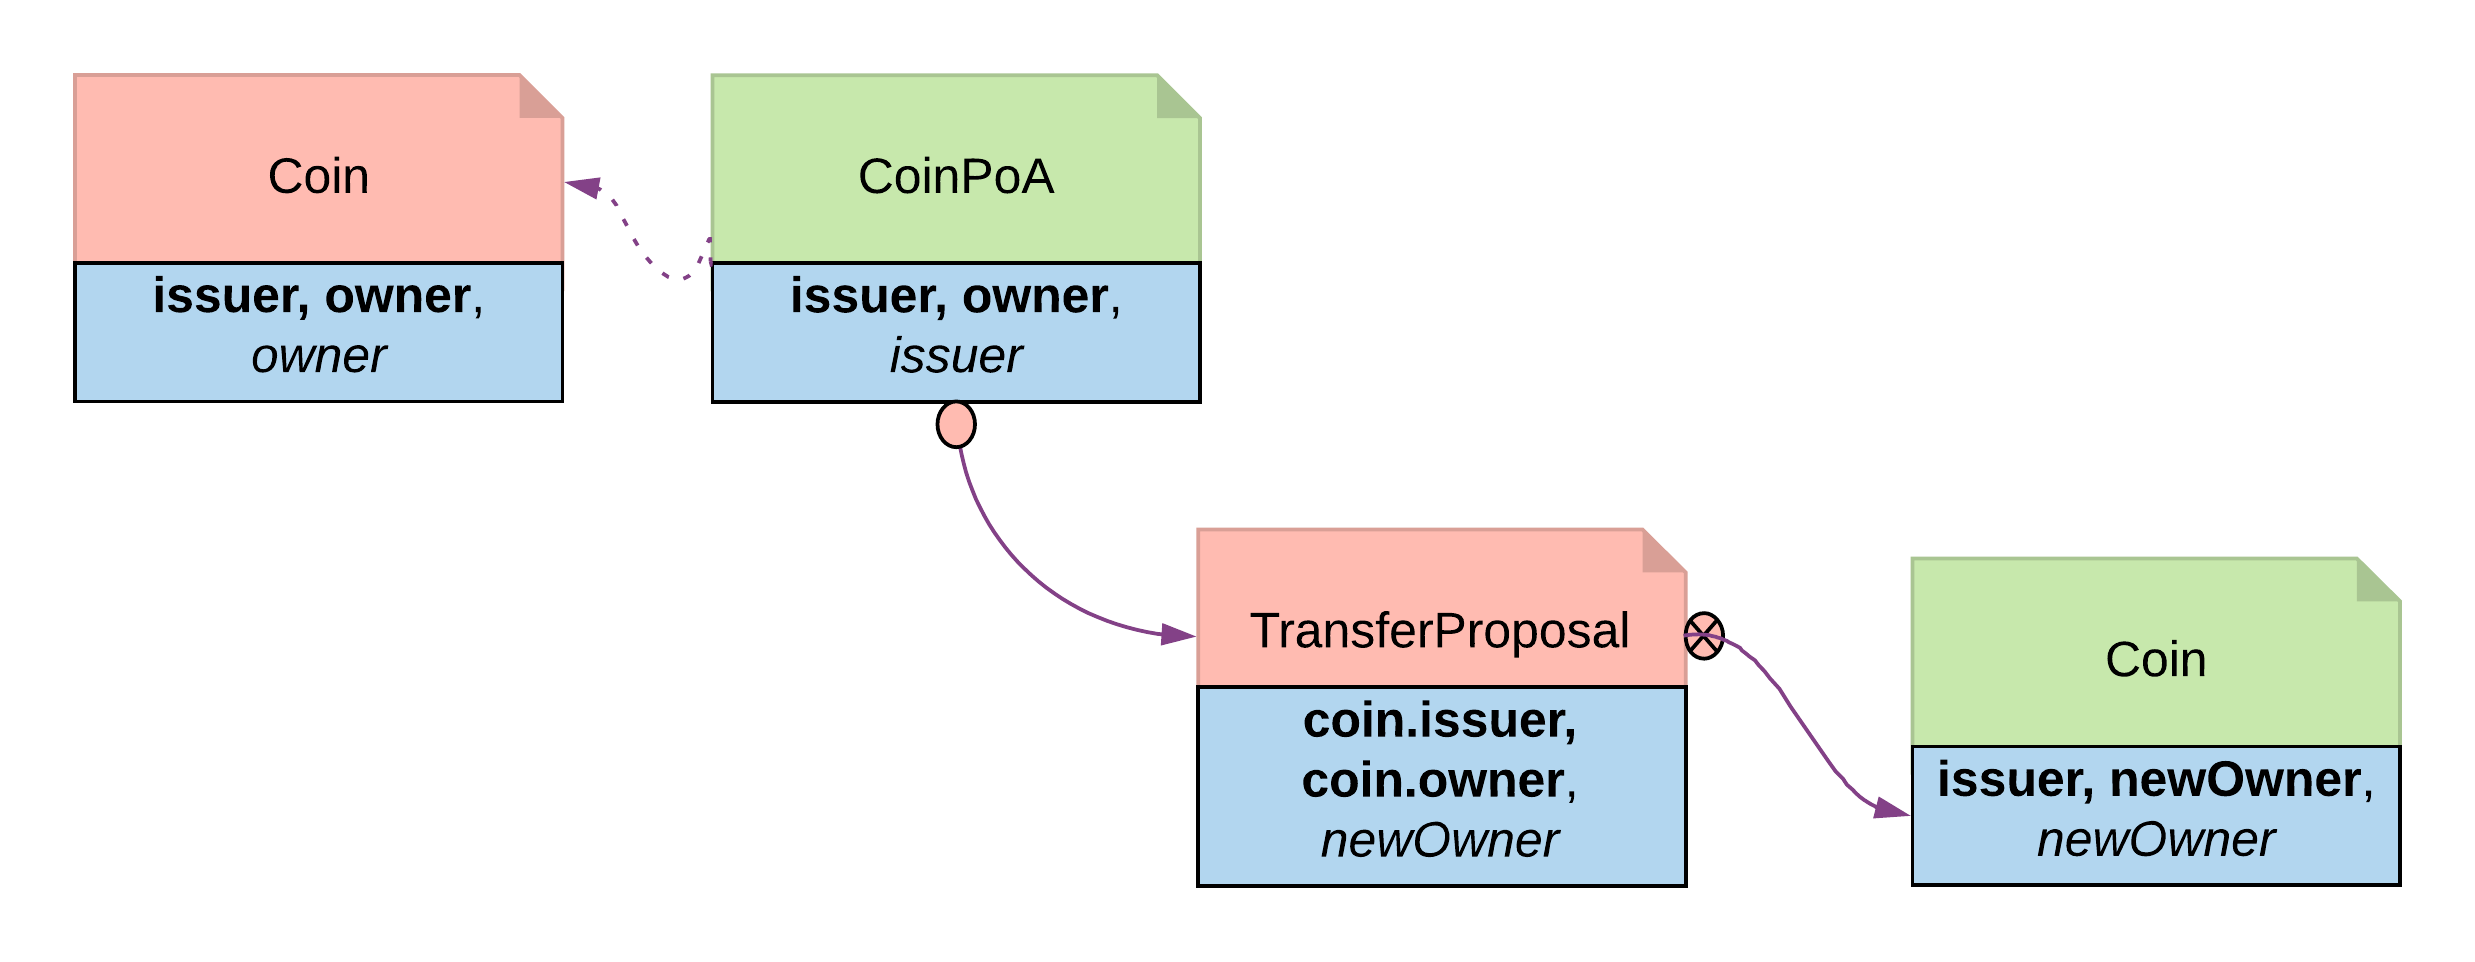
The most common way to get multiple parties to agree on a shared contract. One party creates a proposal contract that the other party can accept, reject, or let expire. TheIouProposal in the authorization module is another example of this pattern.
It takes two to tango, but one party has to propose. It is no different in the business world. The contractual relationship between two businesses often starts with an invite, a business proposal, a bid offering, etc.
Invite — When a market operator wants to set up a market, they need to go through an onboarding process in which they invite participants to sign master service agreements and fulfill different roles in the market. Receiving participants need to evaluate the rights and responsibilities of each role and respond accordingly.
Propose — When issuing an asset, an issuer is making a business proposal to potential buyers. The proposal lays out what is expected from buyers, and what they can expect from the issuer. Buyers need to evaluate all aspects of the offering, e.g. price, return, and tax implications, before making a decision.
The Propose and Accept pattern demonstrates how to write a Daml program to model the initiation of an inter-company contractual relationship. Daml modelers often have to follow this pattern to ensure that no participant is forced into an obligation.
The issuer creates a CoinMaster contract, then uses it to invite an owner. The invitation is a proposal contract with the issuer as signatory and the owner as observer:
Reject and Counter choices:
Delegation
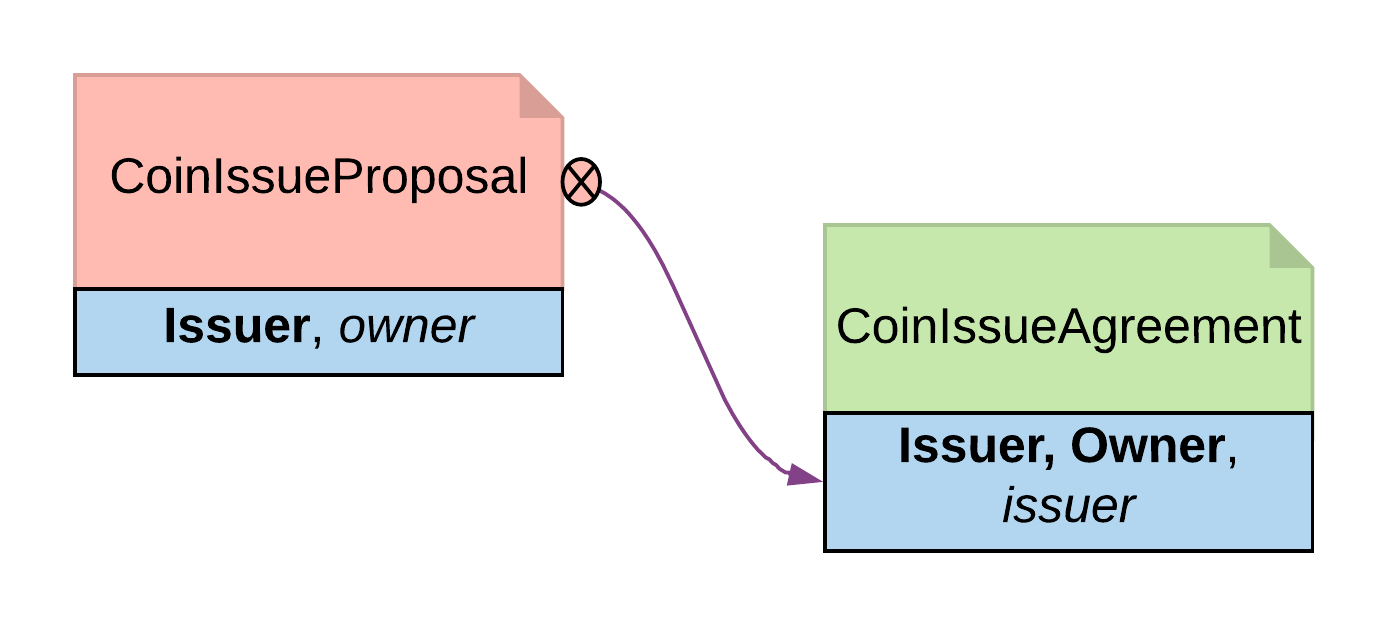
Gives one party the right to exercise a choice on behalf of another. The principal creates a delegation contract that authorizes an agent to act for them, without the principal committing each action. This models real-world custodian relationships where a bank holds securities and settles transactions on a client’s behalf. Delegation is prevalent in the business world. In fact, the entire custodian business is based on delegation. When a company chooses a custodian bank, it is effectively giving the bank the rights to hold their securities and settle transactions on their behalf. The securities are not legally possessed by the custodian banks, but the banks should have full rights to perform actions in the client’s name, such as making payments or changing investments. The Delegation pattern enables Daml modelers to model the real-world business contractual agreements between custodian banks and their customers. Ownership and administration rights can be segregated easily and clearly. The delegation contract (CoinPoA — Power of Attorney) has the principal as signatory. The attorney controls a TransferCoin choice that exercises Transfer on the principal’s coin:
CoinPoA is subject to the business agreements between principal and attorney. For simplicity, in this example, the attorney is not a signatory.
The coin must be disclosed to the attorney before they can exercise the delegated choice. This is done by adding them as an observer via a Disclose choice on Coin:
Authorization
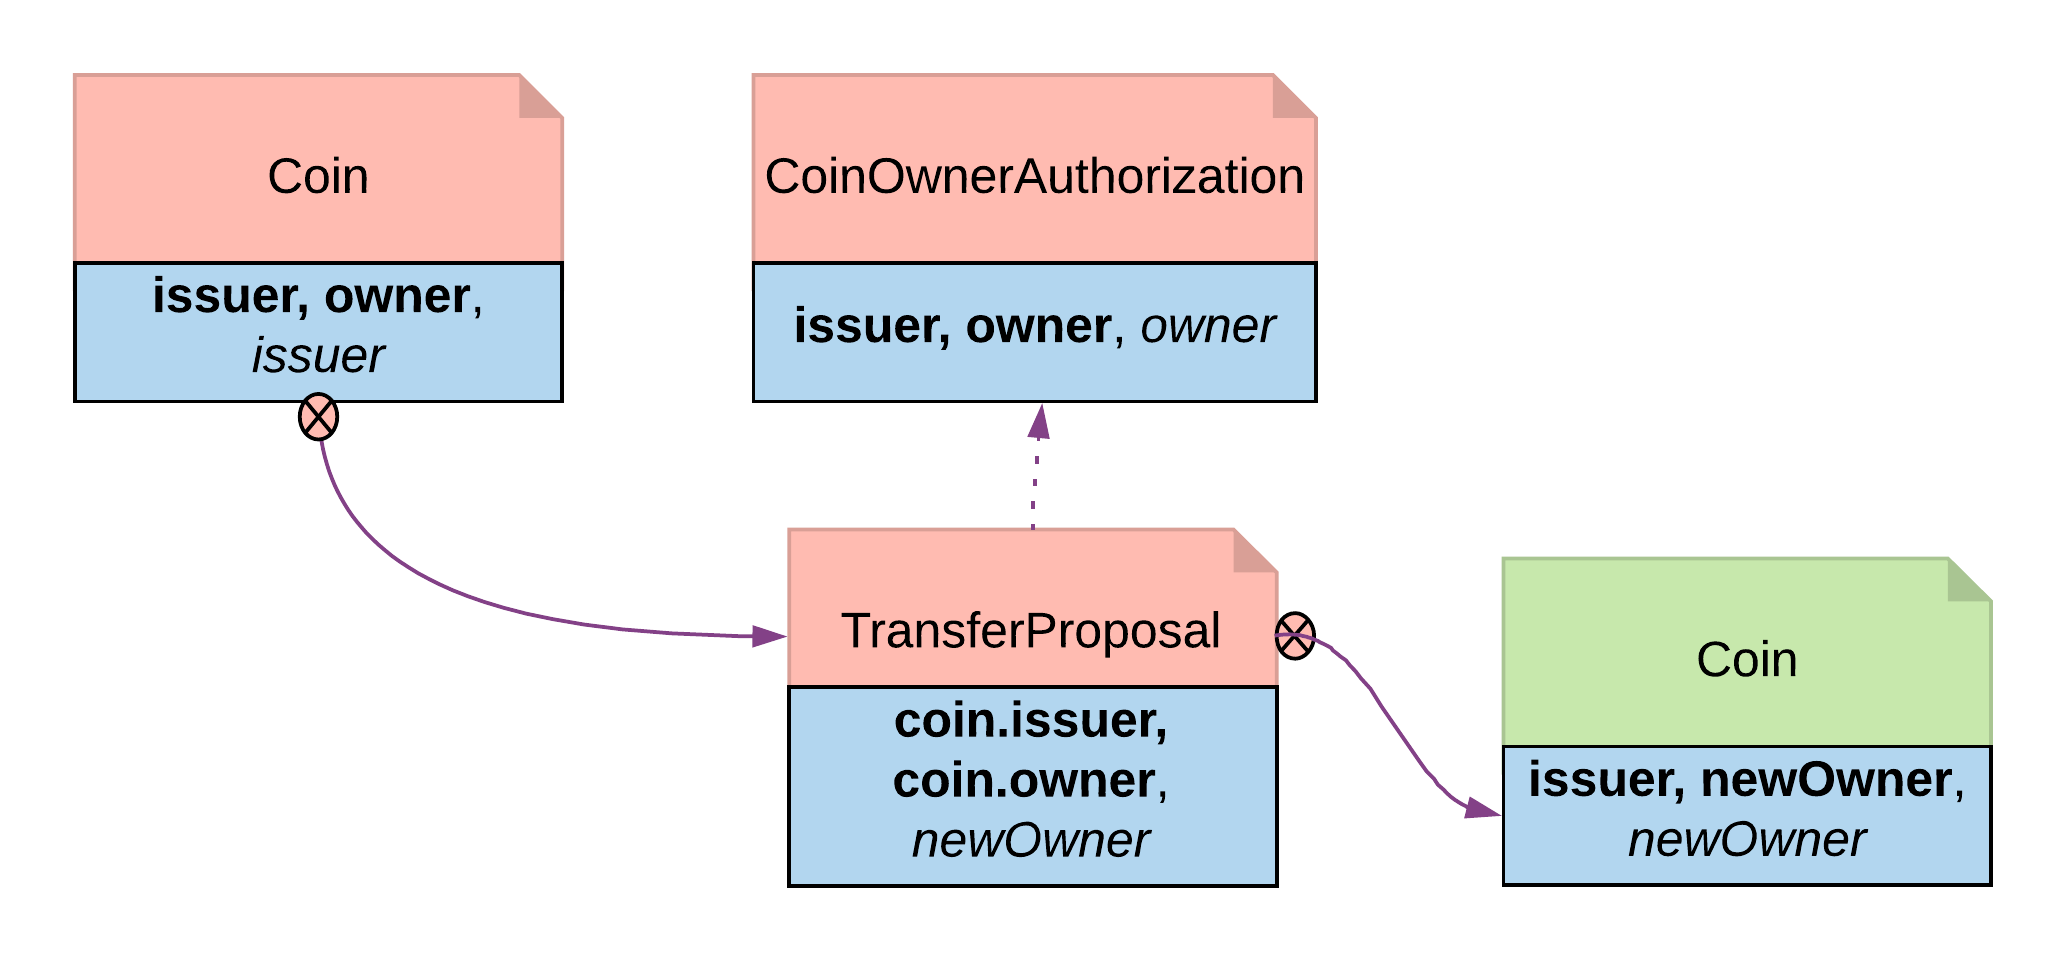
Verifies that a controlling party has the right permissions before they take certain actions. An authorization contract serves as proof — the choice body checks for its existence and validity before proceeding. Authorization is a universal concept in the business world, as access to most business resources is a privilege and not given freely. For example, security trading may seem to be a plain bilateral agreement between the two trading counterparties, but this could not be further from the truth. To be able to trade, the trading parties need to go through a series of authorization processes and gain permission from a list of service providers such as exchanges, market data streaming services, clearing houses, and security registrars. The Authorization pattern shows how to model these authorization checks prior to a business transaction. For example, an issuer wants to ensure that only accredited parties can receive coin transfers. The issuer creates an authorization token for approved owners:AcceptTransfer choice on TransferProposal requires the new owner to supply their authorization token. The asserts verify the token matches the issuer and the new owner:
Locking
Prevents choices from being exercised on a contract while it is in a locked state. Useful for scenarios like securities settlement where assets must be frozen during clearing. Locking is a common real-life requirement in business transactions. During the clearing and settlement process, once a trade is registered and novated to a central clearing house, the trade is considered locked-in. This means the securities under the ownership of the seller need to be locked so they cannot be used for other purposes, and so should the funds on the buyer’s account. The locked state should remain throughout the settlement payment-versus-delivery process. Once the ownership is exchanged, the lock is lifted for the new owner to have full access. There are three ways to achieve locking:Locking by archiving
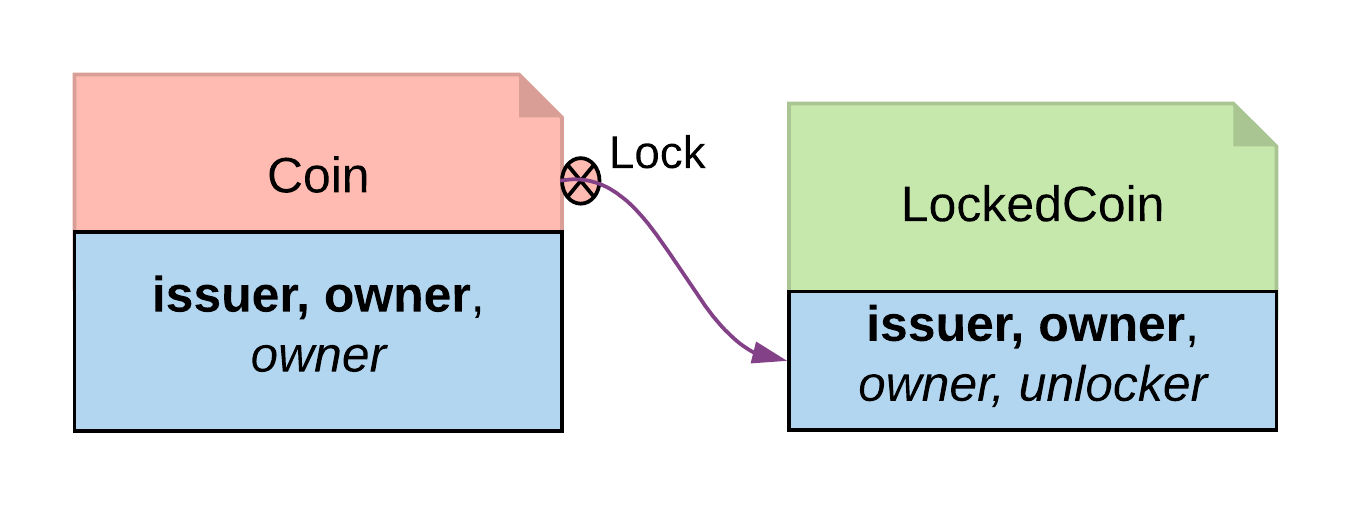
Archiving is a straightforward choice for locking because once a contract is archived, all choices on the contract become unavailable. Archiving can be done either through a consuming choice or an archiving contract. Consuming choice The steps below show how to use a consuming choice in the original contract to achieve locking:- Add a consuming choice,
Lock, to theCointemplate that creates aLockedCoin. - The controller party on
Lockmay vary depending on business context. In this example,owneris a good choice. - The parameters to this choice are also subject to business use case. Normally, it should at least have locking terms (e.g. lock expiry time) and a party authorized to unlock.
LockedCoin to represent Coin in the locked state. LockedCoin has the following characteristics, all in order to be able to recreate the original Coin:
- The signatories are the same as the original contract.
- It has all data of
Coin, either through having aCoinas a field, or by replicating all data ofCoin. - It has an
Unlockchoice to lift the lock.
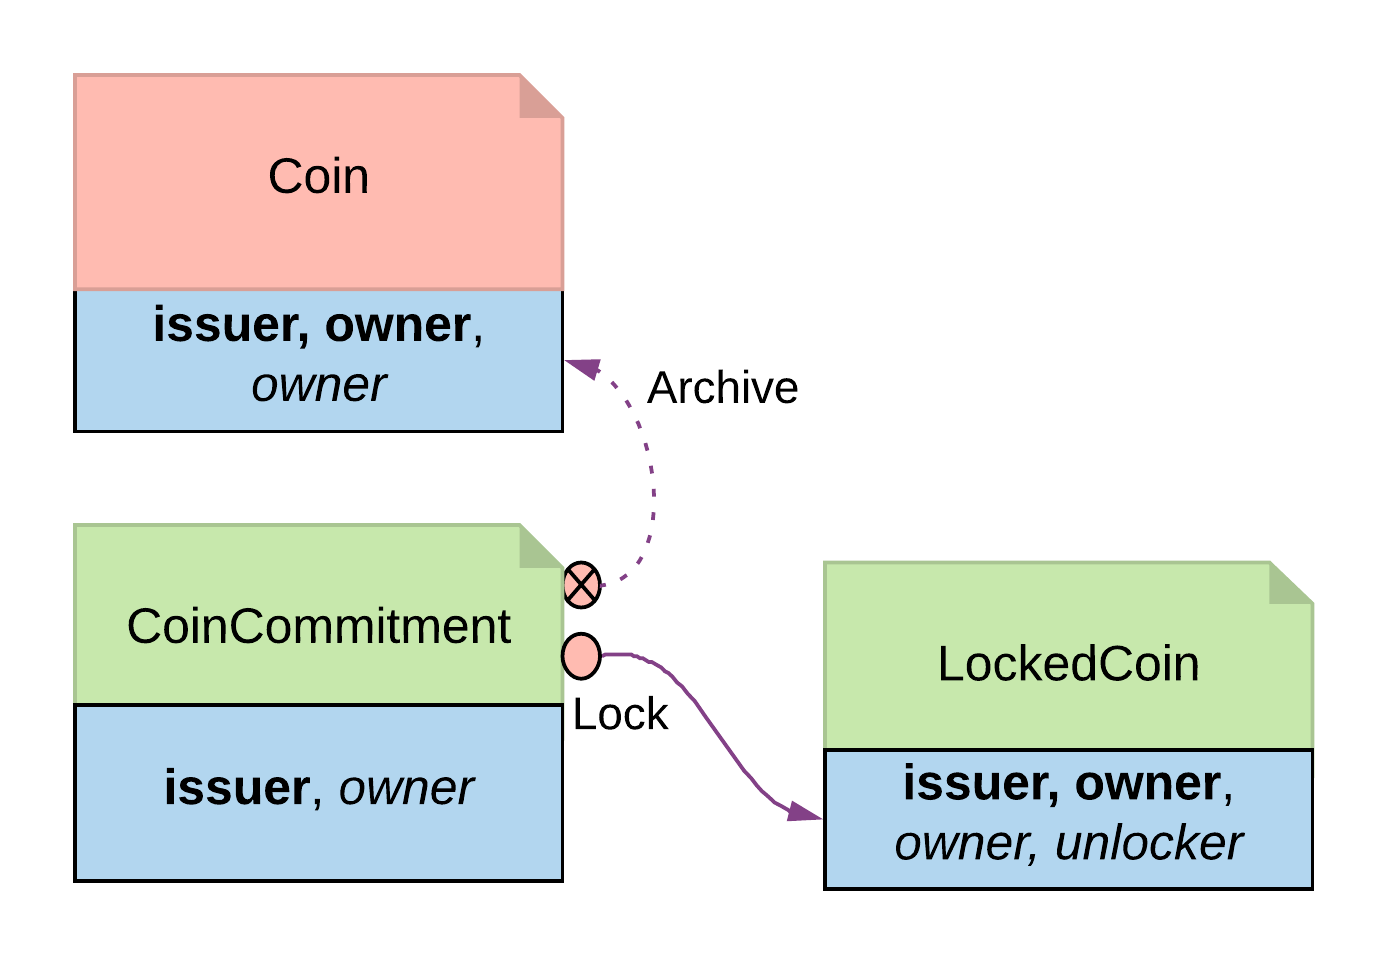
Archive choice, you can introduce another contract, CoinCommitment, to archive Coin and create LockedCoin.
Examine the controller party and archiving logic in the Archives choice on the Coin contract. A coin can only be archived by the issuer under the condition that the issuer is the owner of the coin. This ensures the issuer cannot archive any coin at will:
Archives choice from CoinCommitment, its signatory has to be the issuer. The controller party and parameters on the Lock choice are the same as described above for locking by consuming choice — the additional logic required is to transfer the asset to the issuer, and then explicitly call the Archive choice on the Coin contract. Once a Coin is archived, the Lock choice creates a LockedCoin that represents Coin in the locked state:
- Locking by archiving disables all choices on the original contract. Usually for consuming choices this is exactly what is required, but if a party needs to selectively lock only some choices, remaining active choices need to be replicated on the
LockedCoincontract, which can lead to code duplication. - The choices on the original contract need to be altered for the lock choice to be added. If this contract is shared across multiple participants, it will require agreement from all involved.
Locking by state change
In its original form, all choices onCoin are actionable as long as the contract is active. Locking by state requires introducing fields to track state. This allows for the creation of an active contract in two possible states: locked or unlocked. A Daml modeler can selectively make certain choices actionable only if the contract is in an unlocked state. This effectively makes the asset lockable.
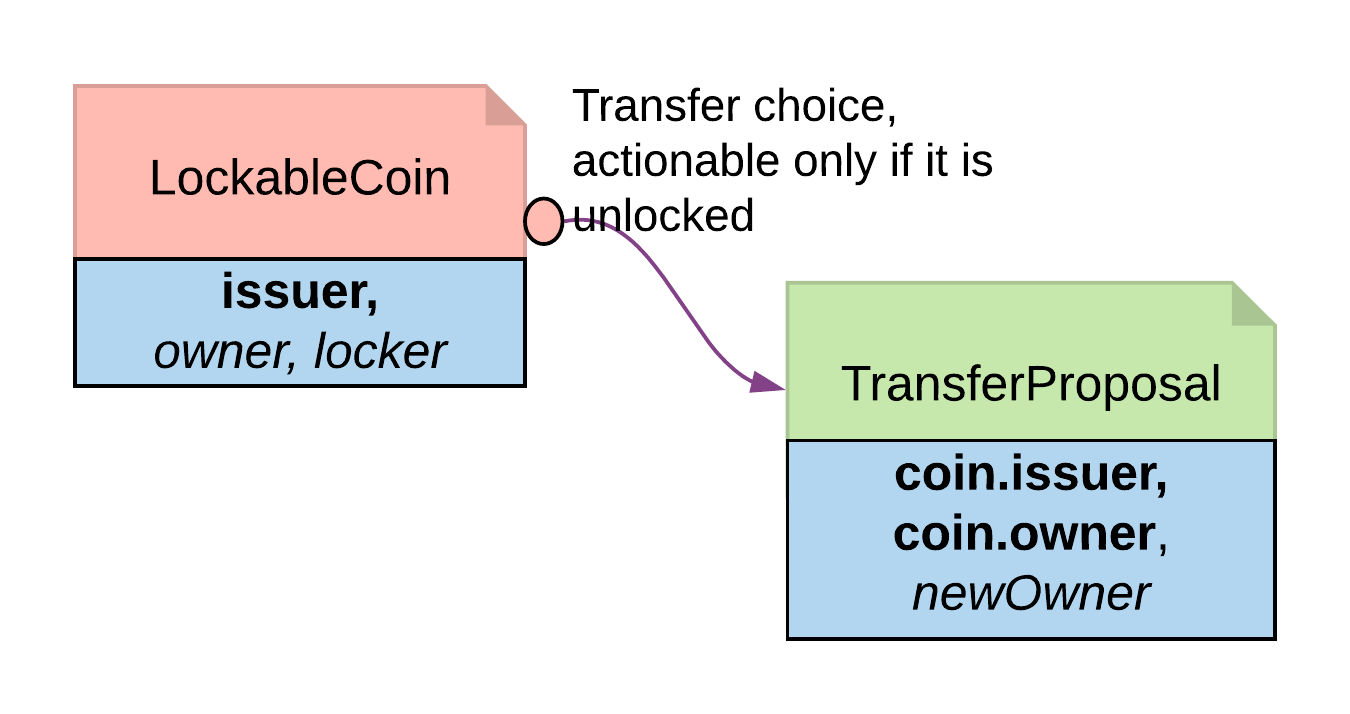
The state can be stored in many ways. This example demonstrates how to create a LockableCoin through a party. Alternatively, you can add a lock contract to the asset contract, use a boolean flag, or include lock activation and expiry terms as part of the template parameters.
Here are the changes made to the original Coin contract to make it lockable:
- Add a
lockerparty to the template parameters. - Define the states: if
owner == locker, the coin is unlocked; ifowner != locker, the coin is in a locked state. - The contract state is checked on choices:
Transferis only actionable if the coin is unlocked;Lockis only actionable if the coin is unlocked and a third-party locker is supplied;Unlockis available to the locker party only if the coin is locked.
- It requires changes made to the original contract template. Furthermore, every choice intended to be locked needs to change too.
- If locking and unlocking terms (e.g. lock triggering event, expiry time, etc.) need to be added to the template parameters to track the state change, the template can get overloaded.
Locking by safekeeping
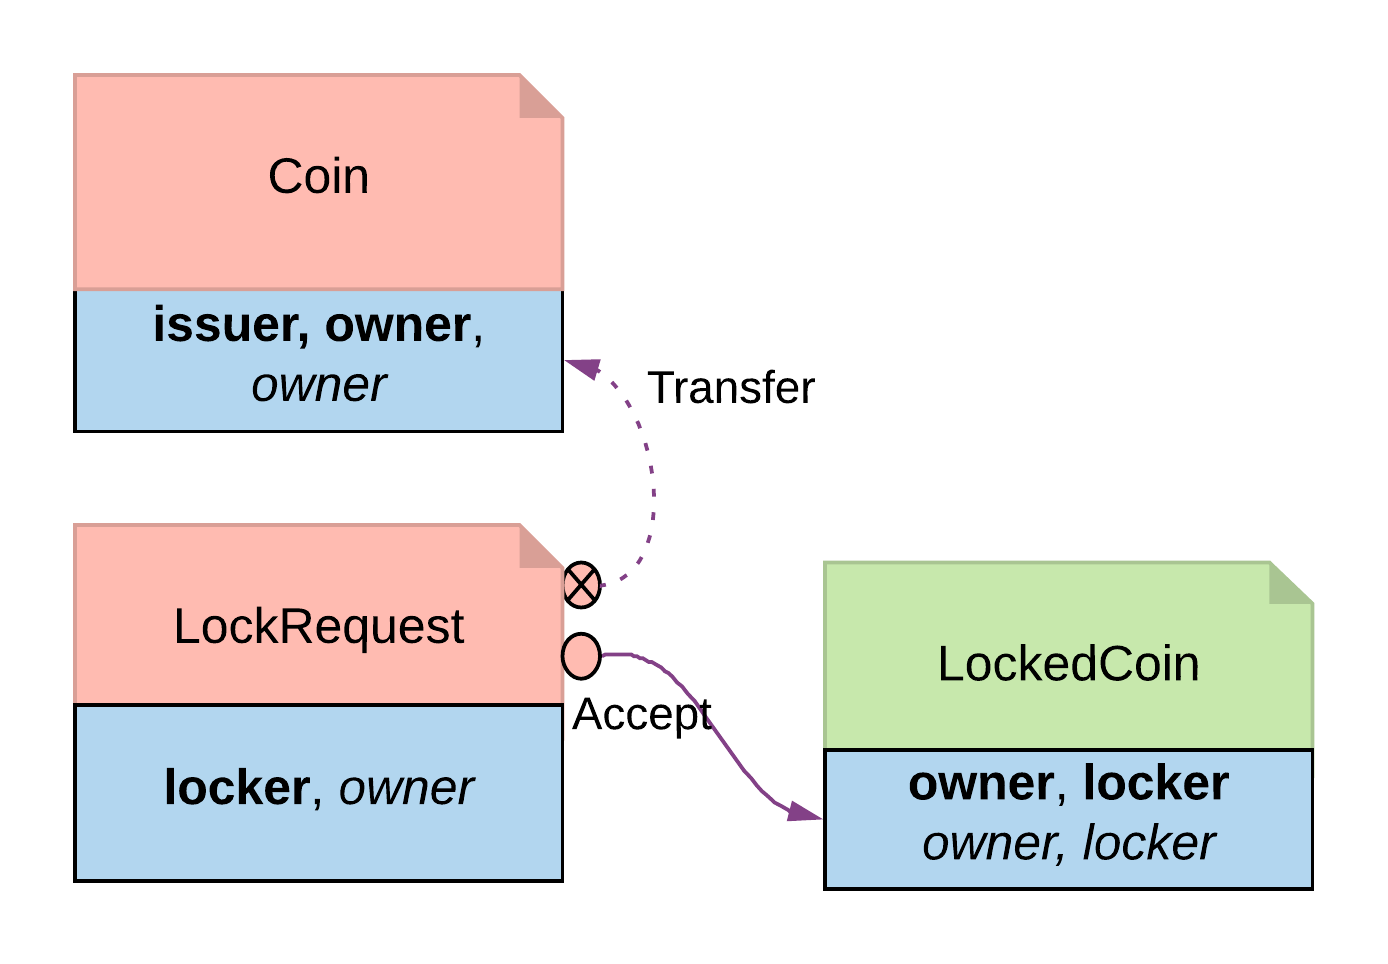
Safekeeping is a realistic way to model locking, as it is a common practice in many industries. For example, during a real estate transaction, purchase funds are transferred to the seller’s lawyer’s escrow account after the contract is signed and before closing. There is no need to make a change to the original contract. With two additional contracts, we can transfer theCoin ownership to a locker party:
LockRequesthas a locker party as the single signatory, allowing the locker party to unilaterally initiate the process and specify locking terms.- Once the owner exercises
Accepton the lock request, the ownership of the coin is transferred to the locker. - The
Acceptchoice also creates aLockedCoinV2that representsCoinin the locked state.
LockedCoinV2 represents Coin in the locked state. It is fairly similar to the LockedCoin described above for locking by consuming choice. The additional logic is to transfer ownership from the locker back to the owner when Unlock or Clawback is called:
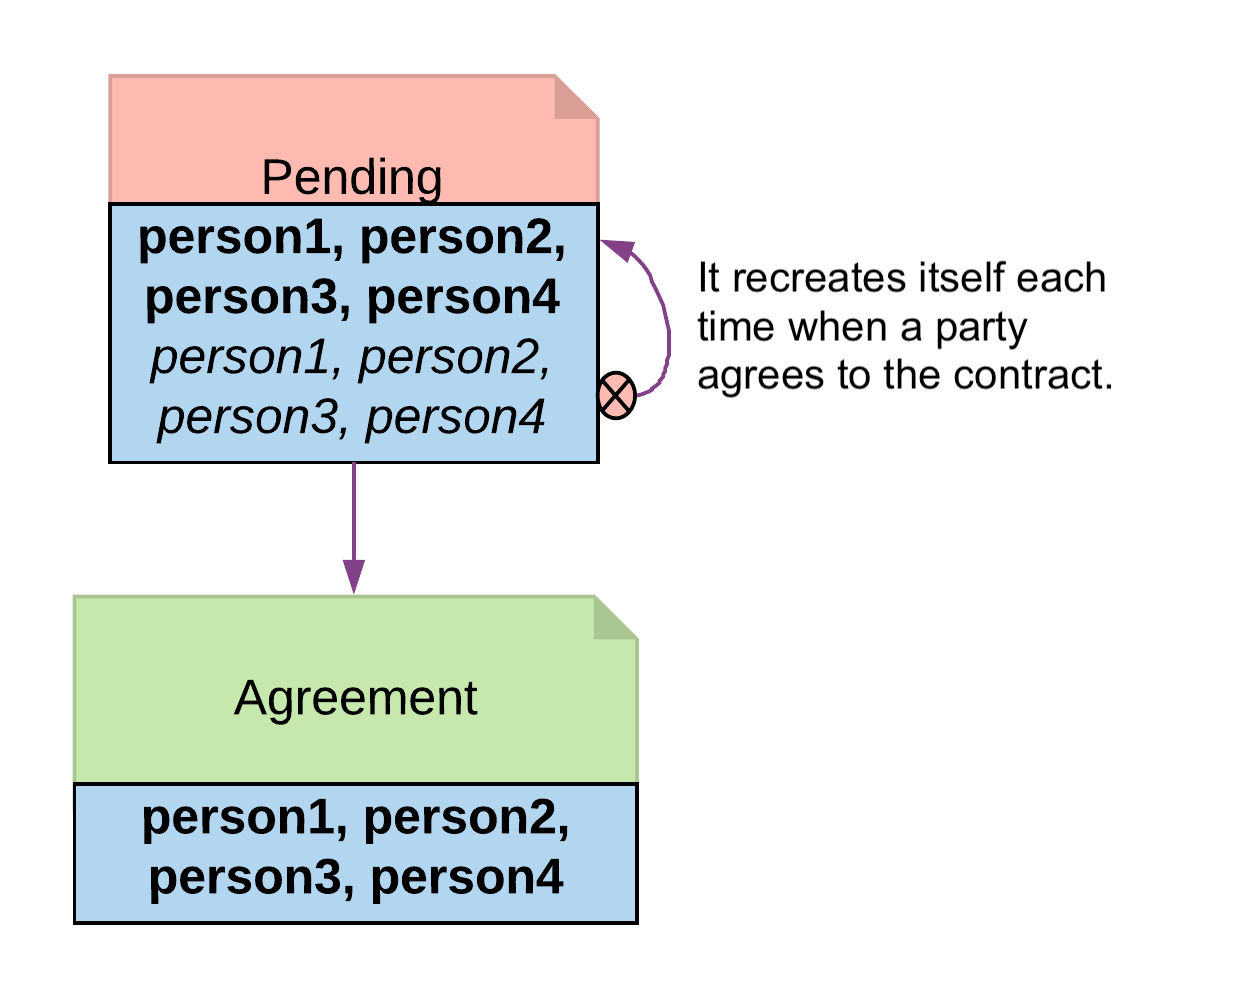
Multiple party agreement
Collects signatures from more than two parties. APending contract wraps the final Agreement and tracks who has signed. Each party signs by exercising a Sign choice, and once all parties have signed, any of them can Finalize to create the agreement.
Propose-Accept (above) shows how to create bilateral agreements in Daml. However, a project or a workflow often requires more than two parties to reach a consensus and put their signatures on a multi-party contract. For example, in a large construction project, there are at least three major stakeholders: owner, architect, and builder. All three parties need to establish agreement on key responsibilities and project success criteria before starting the construction.
If such an agreement were modeled as three separate bilateral agreements, no party could be sure if there are conflicts between their two contracts and the third contract between their partners. If Propose-Accept were used to collect three signatures on a multi-party agreement, unnecessary restrictions would be put on the order of consensus, and a number of additional contract templates would be needed as intermediate steps. Both solutions are suboptimal.
Following the Multiple Party Agreement pattern, it is easy to write an agreement contract with multiple signatories and have each party accept explicitly.
The final agreement contract has multiple signatories:
Pending contract collects signatures one by one. It is observable by all required signatories, so each can see when it is their turn to sign:
Pending contract listing only themselves as signed. The others sign in any order, and once complete, any signatory can finalize: